Part I: Why Voice Over?
Although music can be very memorable in a game, voice over (VO) can also have a great impact on the gamer's experience. Whether its something short:
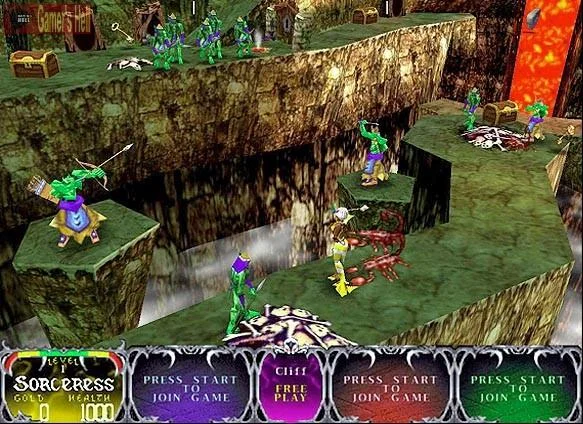
Red warrior needs more mana!
(Gauntlet Legends)
or much longer, such as an entire memorable cut scene:
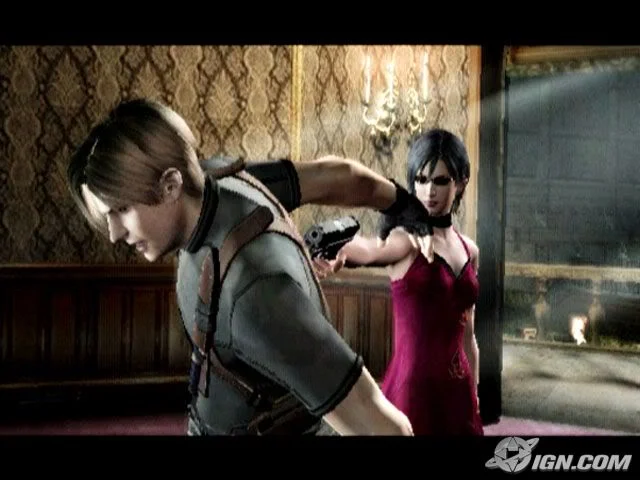
Resident Evil 4
In my mind, these are really the two major types of VO. There is the kind that is short (like in gauntlet) that is almost more of a sound effect -- it is triggered by the player's action and acts as an aid to prevent them from doing something incredibly stupid or to praise them for doing something right. The other type is integral to the storyline of the game, such as the RE4 cut scenes, with character narration, etc, but really is much more controlled by you, the game designer as to when such dialog is played. Why is this so critical?
Placement makes perfect
Think about this -- have you ever played a game that had a bunch of voice over that kept interrupting itself? Not very professional, was it? If you have TOO much VO as a "sound effect" this can happen very easily. If you are going for this effect, keep the dialog very short to help prevent against this. Also, there is some post processing (presented in part IV) that can help this kind of dialog sit nicely above the action in the audio spectrum.
If you are doing something that the sectond type -- where it advances the story -- you have much more leeway in the dialog you want to use, especially its length. Since it will probably not be interrupted, feel free to write more.
Who's the writer on this thing??
We've all seen the sitcom cast that has incredible talent, but it is obvious that the writers need to find a new line of work. Before you begin recording, make sure the writing you have planned is good. Read it to friends. Read it the way that you would like it performed, including any inflection, accent, emotion. You may not be a great actor, but hopefully those that you show it to can see through that to the POTENTIAL of what it could be.
Ready to go!
Okay, you have some placements picked out and a script ready to roll! Now what?
How to produce voice-overs that DON'T SUCK: Part II, The Tools
In this article I will lay out for you the minimum tools that I would recommend to record a quality voice over (VO).
Computer
Mac, PC or Linux... choose your poison. Although I profess to be a Mac guy myself, I have no beef with any OS. The bottom line is that you need two high-quality pieces: a good sound interface and a good audio editor. These abound by the dozen. If you are going to be doing this sort of thing for the long haul it would of course behove you to investigate the pros and cons of all of them before making your purchase.
In general, I would recommend looking at a multitracker as opposed to a 2-track editor. The reason being that two-track editors offer a more simplistic environment and often offer advanced sound design and editing features (such as those found in Peak Pro, a favorite sound effect/VO editor of mine. For example, I found the ability to loop a sound with a cross-fade built in extremely easy and very convincing for taking seemingly random sound scape materials (such as crickets in the forest) and slicing it down to a meer 20-30 seconds without it ever appearing to "loop". This is easy enough when you are dealing with sounds that have a very finite beginning and end (foot steps, for example), but becomes extremely complicated when you start working with sounds that are continuous (a train flying down the tracks, or crickets, or a waterfall, to name a few).
However, I have also had lots of success recording straight into Logic Pro 7, a multi-track editor. The advantage here is that you can then easily mix in additional sounds, music, voice all at once and adjust their balance, pan, EQ, effects, etc. all in real-time.
There are a variety of multi-track editors to choose from. I have compiled an incomplete list of some of the better-known and well-used packages here:
1) Logic Pro (Mac) - www.apple.com/logicpro
2) Pro Tools/Pro Tools LE (Mac and PC) - www.digidesign.com
3) Digital Performer (Mac and PC) - www.presonus.com/
4) Nuendo (Mac and PC) - www.steinberg.de/ProductPage_sb190e.html?Product_ID=2442&Langue_ID=2
5) Cubase (Mac and PC) - www.steinberg.de/ProductPage_sb51ba.html?Product_ID=2442&Langue_ID=2
6) Vegas (PC) - www.sonymediasoftware.com/products/showproduct.asp?pid=965
Sound Interface
Many computers come with built-in sound capabilities. However, the quality of these sound interfaces often varies dramatically. The standard for these types of devices that DO support sound-in is usually stereo-in using a 1/8" jack, digitizing at 16 bit, 44.1khz. This can be considered fairly basic stuff. The 1/8" jack presents an assortment of problems. First, there is no way to provide phantom power throught this jack (which we'll discuss soon when talking about microphones) and the preamp (if there is any) is often very low in quality resulting in poor quality electric guitar/bass direct-in.
In addition, the standard for professional quality sound is 24-bit, not 16-bit. Sampling rates may still start at around 44.1 khz but are often done at 96khz or even 192 khz. These extremely high sampling rates however are probably more than you really need just to record a professional sounding voice over. However, a discussion of sampling rates and their effects on sound quality really could fill an entire article so I'll leave that for another time. (Hint, hint...)
Finding a reasonable quality sound interface that supports 24-bit and phantom powered XLR connection for a condensor microphone should do the trick.
MOTU 828 MKII
The rig that I use is a MOTU 828mkII firewire interface. This is probably overkill for just doing a voice over, but since I have many different sound sources in my studio, the additional channels are a necessity, not a luxury. Here are some other well-known brands in the industry that offer a range of products that should fit the bill in the form of PCI card, USB or Firewire:
1) MOTU - www.motu.com
2) M-Audio - www.m-audio.com
3) Pro Tools - www.digidesign.com
4) Tascam - www.tascam.com
5) Edirol - www.edirol.com
6) Mackie - www.mackie.com
Microphones
Microphones are a very tricky subject. They are very, very difficult to choose because each of them has very much a characteristic "sound". Sure, they can be generally lumped into a handful of categories, but in the end, each has a unique sound. Unfortunately, from a catalog it is often very hard to judge what that "sound" will be. My usual recommendation is to go by word-of-mouth from folks you know, follow message boards the mic you are thinking of and stick with well-known brands.
There are tons of brands in microphones -- most of them fighting for the sub $99 spot. If possible, go to a local music store and try out a few of these. Let your eyes be you guide. There's some GREAT stuff in the $75-$300 range, but make sure you do your homework first.
Rode NT2
The microphone that I have now that I prefer for voice over is the Rode NT2. (Around $200, last time I checked) It does a very good job of capturing the warmth of the human voice and the nuances within it. For ANY voice over job, I would highly recommend using a p-pop filter placed a few inches in front of the mic to stop high-speed air from hitting the diaphragm of the mic. These high-speed air produceds the "pops" heard when saying a sibilant sound (such as the "t" in "tomb" or "b" in "bob") Anytime you hear these booms you can immediately pick out a voice over as amateur.
Compressor/Limiter/Expander
Now we're getting serious. Sure, these types of DSP functions exist in software recording tools, but nothing beats the quality or response of a hardware unit. These can now be bought quite cheaply, and even the lower-end products offer decent performance. However, read a review or two to make sure that no one has complained of excessive noise from the unit you are looking at.
Without getting into too much detail, this unit will "smooth out" the dynamics of the signal you are picking up from the mic. They will drop the noise to zero based on a threshold you set (thereby elimnating the hum of your computer when no one is speaking - called a "noise gate") as well as capping the maximum signal (limiting) and bringing up the level when it is too low (expanding). Additionally, the most important part of these units is the compressor, which takes the lowest signal and highest and squeezes ("compresses") these values towards a smaller dynamic range, giving the impression that the performance was more even than it was. The also accounts for minor variations in the distance between the microphone and the sound source. This is especially valuable in recording a voice over!
Behring Composer PRO
The hardware unit that I use, though admittedly "low end" seems to do a nice job. It is the Behringer Composer Pro , picture above. (an older model than what is available now).
Sound Proofing
There are many different ways to approach this, ranging from the extremely professional....
(From Auralex.com)
... to the extremely "guerilla".
What you need is based largely on the environment you are working. Nothing looks cooler or more professional than to have tons of professional acoustical foam set up in geometric patterns all over the place perfectly balancing the acoustical environment in which you are working. However, for many of us, throwing blankets and carpet up on the walls, though shabby looking, will probably have 70-80% the same effect.
For myself, I noticed that my computer's fans were pretty noisy and that I could hear this in my recordings. So, I built a sound isolation box using pro-grade auralex acoustical foam and fiber board, hinges, etc:
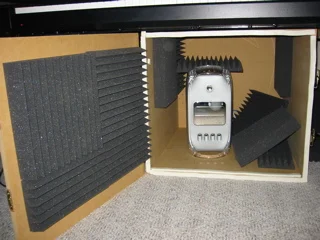
(Coincidentally, if there is interest in the community to learn more about how I did this, please feel free to comment as such and I will do a more thorough write up about this...)
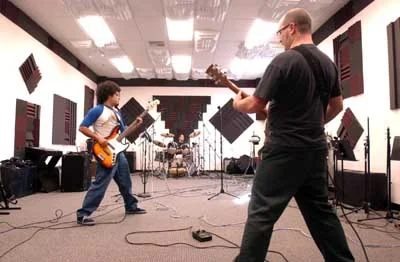
For recording the actual voice, you do NOT want to position your mic and voice talent in line with any hard object that would cause a splash back reflection. Have them talking into a thick comforter or blanket (or acoustical foam!). Surrounding them with soft surfaces really helps. Here is one such set up in my studio:
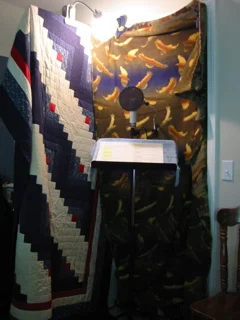
Notice the towel on the music stand to make sure that didn't reflect back.
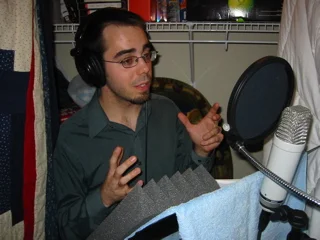
Above is "Dr. Willoughby" from "Wildlife Tycoon: Venture Africa" recording a part for the voice over in the retail version of the game. (Available very, VERY soon at a store near you!)
Part III: The Talent
In the last two articles that I've posted (Part I, Part II) in this series we've discussed both the why and the tools regarding making voice overs for your game. Today, we're going to talk about the talent.
Auditioning
Auditioning talent can be quite tricky. Assuming that you aren't going through a professional talent agency and are assured of professional actors, how do you "scout" for talent amongst your friends, neighbors, colleagues, classmates, relatives, etc. to find some people who could pull off the job?
Before you begin, make sure that your script is done. Have everything that you want that person to say figured out and written down. If you're making a WW-II era game ala "Call of Duty" and you're going to have a bunch of guys jumping around yelling short phrases and screaming, make sure you decide how many screams you will need. How will they be different? Think about their placement in the game... will you hear lots of scream sounds cued in short order? If so -- you may want to go for multiple effects for the same "action" so you don't have a sound effects track that winds up sound like this during game play:
Ahh!
Ahh! - - Hhh
Ahh ahh hhh
ahh ahh ahh aahh
(you get the picture)
Also, if you DO have the same effect, and they are cued simultaneously, will you have multiple sounds overlapping or have them essentially interrupt each other and start over? Planning ahead for durations and frequency can really help prevent these problems.
Your sound will be far more natural if you mix it up. This same rule goes for sound effects.
Now, beyond the short phrases that may happen frequently in more of a sound effects manner rather than voice over (another example that comes to mind is the infamous "level up!") think about what type of voice you want for each of your characters. Many people are character actors who don't know it. These are people who can change their manner of speech and the sound of their voice to convincingly sound unlike themselves. Professional actors are well known for this. For example, all of the voices in the Simpsons TV show are done by 4-5 people (not sure on exact number -- don't flame me!)
For example, let's say that you decide -- we need a man with a chinese accent who speaks english, perhaps another who is british and a woman who is from the south and in her late 70's. These simple descriptions probably conjoured some sort of vision in your head as to what they should sound like. Make the story guide you. Although some things may be able to get done in post processing -- to help these things, you are ALWAYS better off starting with a good source. The one exception for this is things like "alien voices" or monsters which sound so inhuman that its best to let the technology help you.
The Casting Call
So, you've sent out some emails to people you know who would be interested, maybe posted some flyers around town or your dorm room, worklpace or whatever. The casting call should have more or less described in simple terms the kind of of voice you are looking for as I explained above.
So here you are on casting call day. Great! I hope some people showed up.
You ALWAYS want to do the readings with the actual equipment that you will be using to record them. This serves two purposes. One, you'll be able to go back and review their audition after the fact. This is especially in cases where you want others working your game to have a say in who you use. Second, people's voices change whenever they are recorded -- there is ALWAYS some coloration in your system at some level, so its good to know how their voice picks up on the mic.
Pick out a few choice passage for them to read. Have them read it once without the mic and give them some direction if you don't think its the way you'd like it. Try and read it to them the way you want it read. Put appropriate pauses in or emphasize certain words. Explain the emotion that comes in this scene or in the scenario in the game. Is there a sense of urgency? Are they scared? Angry? Frustrated? Depressed? All of these things can come through in someone's voice.
Do NOT leave it up to the talent to interpret what you have written. This is YOUR show and they should be doing this the way YOU want. If any actor starts saying "I think it should be more this way..." and you don't instantly agree with their idea, I would seriously think twice about casting them as they will probably be more trouble than they are worth!
Let the talent then record each phrase you are having them read once or twice. Keep the total length down to around 10-20 seconds that they are reading. In this way, you should be able to process auditions fairly quickly.
Amanda Engelke records the voice of "Mrs. Carrilou" in Wildlife Tycoon: Venture Africa from Pocketwatch Games -- in stores NOW!
Cast!
Great -- now you have your actors picked out. Unless multiple people are having a conversation in a game, try to have them all come on seperate days. Until you've done this many times, its pretty hard to estimate the total amount of time this process will take, so allowing more time than less is probably a good thing.
In your multitrack editor of choice, I recommend recording each cue (or "take") several times to the same track. This helps me stay organized -- but you may find another organizational strategy may work equally well for you. For tons of cues, perhaps it makes more sense to have multiple project files so you don't have hundreds of tracks... its your choice.
While you are recording them, watch your gain levels. Its easy to make the mistake of recording people at to low a level and then using the near-silent amplifiers of modern technology to make it "seem" loud to you. However, when you actually try to bring that sound up in the game, it will probably sound very noisy and harsh or worse yet -- peak and distort. Getting a good qualit signal strength to begin with is key to making this work. You don't need it peaking into the yellow... but several green bars is typically a very good thing.
Part IV: Post Production
Now that you have everything recorded, its time now to enter post production. In this phase, which will be covered in my fourth and final installment of this series, I'll discuss some of the fine tuning that can be done once you have the raw material recorded. Stay tuned!
Before we get started though, I'd like to write a small disclaimer. Audio engineering is far more art than science and the way that I present some of my "solutions" here will not work for everyone nor for every situation. There is a great deal of experimentation involved for both the novice and professional alike. Also, technology differences (different software, hardware, etc.) in your setup will affect the choices and tools you use. Finally, I'm assuming some basic knowledge of how these programs work and instead going to focus on sort of a "tips and tricks" approach. That being said -- let's get started!Here we go! -- Volume Automation
At this point, we've assumed that you've recorded some VO (Voice Over) and at this point just need to massage the sound a bit as to make it more pleasing to the ear. For your entertainment, I've included part of a voice over from Wildlife Tycoon: Venture Africa
Not "bad", but it could use a little work. In fact, it actually had a little work done as far as levels. Are concerned before I bounced this clip for you to hear. Chiefly, I used some volume automation to lower the harshness of some of the constants that this actor performed. A lot of audio engineering is taking a great performance that has just a few issues and "saving it". This was one of those times. You can see in the screen shot below some of the automation that was inserted. (The yellow line across the large waveform).

It should also be worth pointing out from the image above, that the way the entire session was constructed was purposeful. There were around 25 VO's in WTVA that all had similar background fx and music. So, to construct the session, I created a track for each VO that was going to be recorded and then laid in the background fx and music on seperate tracks. In this way, without opening and closing a new project every time, I could record one VO after another. When it comes time to bounce the track to a stereo file, I simply "solo" the music/fx and the VO I'm bouncing and the rest of the VO is muted.
First Pass -- EQ
For EQ, I had a few simple goals. One, I wanted to make the actor's voice sound a bit warmer. Second, I wanted to make sure that it clearly cut through the rest of the mix. To accomplish this, I turned to the fairly advanced Channel EQ plug-in that comes with Logic Pro (I didn't use any 3rd-party plugs for this demo, only those included with Logic Pro, though there are many others out there for lots of different DAW's that achieve similar results). I captured this screen in real-time to show how it can be used.
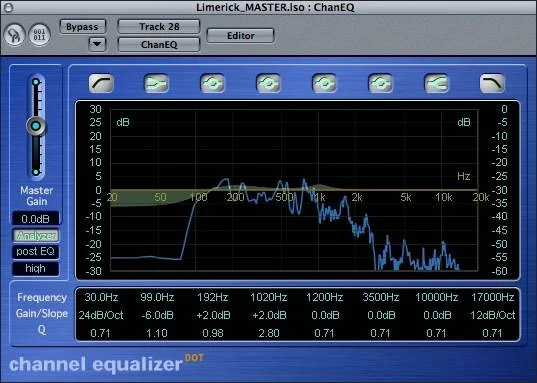
The blue line is the real-time wave form. It moves along with the audio to show you what frequencies are being produced more than others. The green shape is sculpted by you and indicates where in the frequency band you are affecting the sound. Low to High is left to right and louder to softer is top to bottom. Around 1K is where a lot of human speech takes place and is the "clearest" part of speech for many. For this reason I have it a slight boost of around 2db at this range. Notice that I made a nice slope though as well. You can make this very pointed, but the sound turns very harsh. Then, I also gave a slight increase of again around 2db at 200 Hz. For this man's voice, that seemed to really warm it up a bunch. However, at about 120hz, I quickly dove below "0" to make sure it didn't become "boomy" and overly "bassey".
EQ is a lot of fun to play with. Most newbies at it apply way too much because they see how much CAN be applied and really distort the sound. For most cases, less than 5 db in either direction does the trick -- especially for voice.
Next pass -- compression
Now that you are dealing with the right frequency band, time to gently compress the signal. Compression is one of the most useful (and used) plugs/effects used in modern music production. However, it has been in used in one form another by the pros for decades! The most important part of this control is the ratio. Here, I'm compressing 2.2:1.
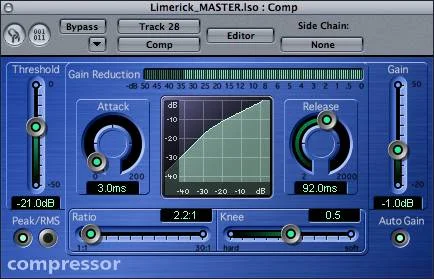
I couldn't tell you the exact math on how that works, but the higher the first number, the more compression that is applied. Basically, it limits the dynamic range possible in the signal by bringing up some of the quieter stuff and bringing down the loud stuff. Sounds simple, but if used improperly, this can radically alter your sound. In general though, a little lite compression gives it that "radio sound" (which is highly compressed) and evens things out tremendously. Yes, it will also "seem" louder (and will be) but this is mostly because the dynamic band has been limited.
Reverb
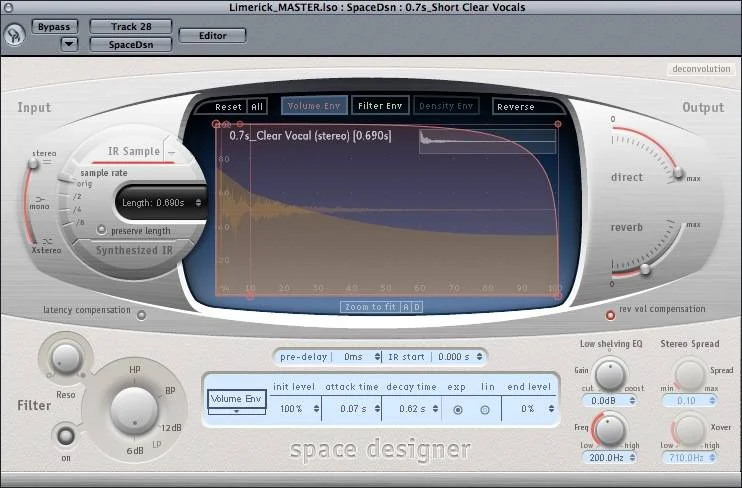
I didn't use a lot of reverb on this track, but just a little for space can really help make it sound like the voice wasn't recorded in a closet. (Which it basically was.) Notice how low the "reverb" slider is set for here. Also, the preset called "Clear Vocal" is a very short reverb (.690s) anyway, so this is not a "hall" type sound or anything. It's simply meant to enhance the sound.
Master Track
Finally, I'll speak a little bit to your master fader. The master fader is the last one the signals pass through before they go to your speakers. Essentially, all the audio gets processed here, so make sure that whatever plugs you use work for everything! There are two that I use fairly consistently.
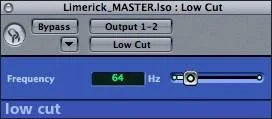
The low cut simply cuts out frequencies lower than the value you set. However, because of various technicalities, this *can* increase the overall dynamic just a hair in the remaining registers. I usually set this for 64-72hz. Why? Granted, most of us can hear or at least feel down to around 20-25hz. However, most *speakers* don't actually reproduce sound that low because of the physics in speaker construction required to do so. Also, instruments with extremely low sounds can "absorb" bandwidth and have an effect on other instruments in higher registers when they play in this low register. In general, you will probably agree that 64-72hz is "bassy enough". Give it a try!
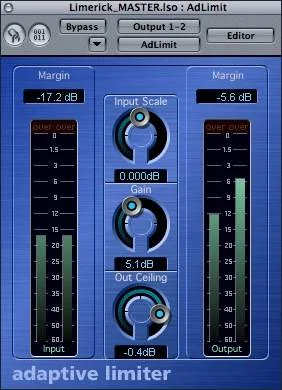
The second thing is an adapative limiter. There are also "mastering" plugs that do a similar thing. This handy thing is like a compressor, but allows you to scale and input against the output, resulting in VERY full sounding, radio-ready tracks. It's quite nice. It also has a nice out ceiling dial which allows you to "master" without going above a certain db. For example, you may want all the music in a game to be at a maximum of -2.5db so that sfx can cut through and be heard. This is a great way to do that.
So what does the final product sound like? Hear it for yourself!
Few! You can see there is quite a bit to learn and experiment with to produce a final track that sounds much better than what you started with. However, with a few tips from this blog series and other books, videos, magazines, web articles, etc. you should be able to produce something relatively satisfying.